Loading the guide…
Publish and share a form
Learn how publishing makes a form live, how to share it as a hosted link or an embed, how to set the confirmation behavior, and where to read view and submission counts.
On this page
A form only does its job once it is published and placed where visitors can reach it. Publishing flips it from an inert draft to a live page; sharing puts it on your site as a hosted link or an embed; and the confirmation behavior decides what a visitor sees after they submit. This article walks through publishing, the three ways to share a form, setting the confirmation behavior, and reading the view and submission counters. It follows on from create a form and set up consent and double opt-in.
Publish to go live
A form must be published to render or accept submissions. While it is a draft, it does nothing: the hosted page and the embed both return a not-found response, so an unpublished form cannot leak submissions or appear half-built to visitors.
- Finish the form
Confirm the fields, the display mode, and the consent settings are all set the way you want. Publishing makes the current configuration live and closes the builder, so finish before you publish.
- Publish
Click Publish in the form's header. Once published, the form renders and starts accepting submissions.
- Grab the share options
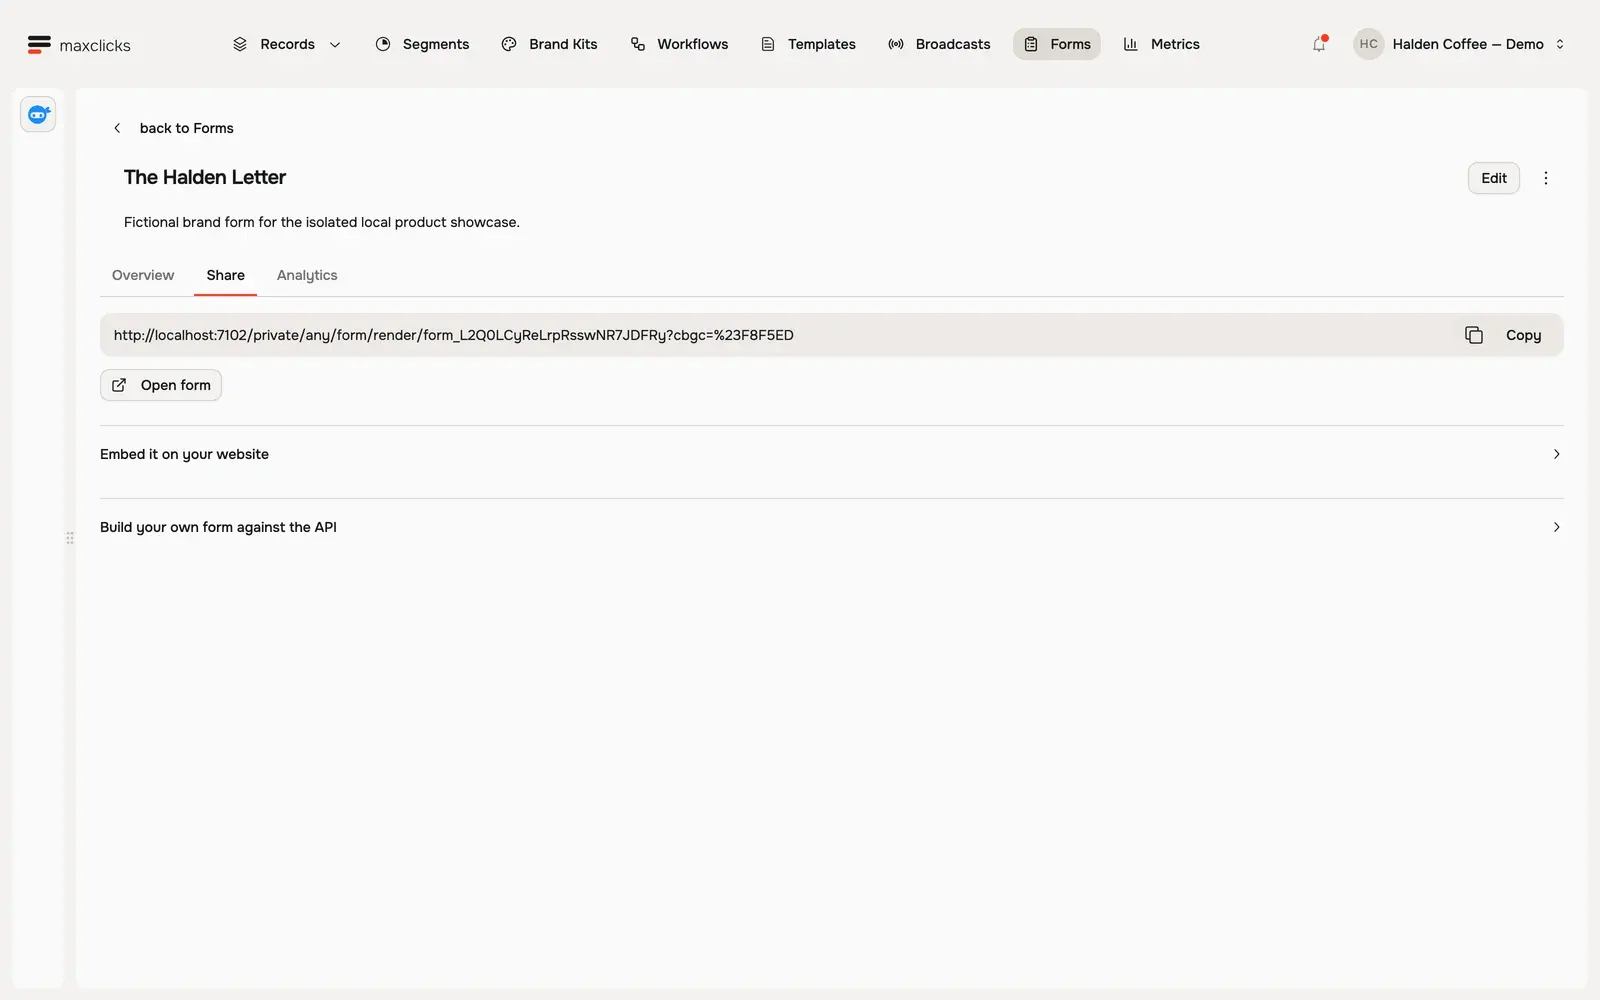
The tabs change on publish: Builder is replaced by Overview and Share, and Analytics stays where it was. The hosted link and the embed code live on the Share tab, ready to place on your site.
Walkthrough steps
Inspect the published Halden form overview, open Share to find its local hosted link and embed/API options, then return to Overview. Double opt-in is off for this demo form. No form submission or external traffic is recorded.
Share the form
A published form can be shared three ways. Pick whichever fits where you want it to appear.
| Method | How it works | Best for |
|---|---|---|
| Hosted link | maxclicks hosts the form at its own page. Share the link directly or link to it from a button. | A standalone signup page, or a link in an email or social post. |
| Iframe embed | Paste the iframe code into your site, plus the handler script beside it. The script sizes the embed to the form's own height and, for a popup form, is what opens it at all. | Placing the form inside an existing page on your own site. |
| Direct API submission | Your own front end posts submissions to the public form endpoint. | A fully custom form UI that still lands contacts in maxclicks. |
The hosted link is the quickest route: no code, only a URL to share or link to. Direct API submission is for teams building their own form markup who want to keep maxclicks as the backend; the public submit endpoint, and the matching double opt-in confirm endpoint, are documented in the developer docs.
Both public form endpoints are unauthenticated by design: a visitor filling out a form is not a signed-in user, so no API key is involved. The endpoints instead protect themselves with rate limits and, if you add one, your CAPTCHA. If you build a custom front end, you post the visitor's field values and their consent decision, and maxclicks applies the same consent, subscription, and double opt-in rules it would for the hosted page. In other words, no share method is a shortcut around consent: the rules live on the form, not on the surface that renders it. One caveat: a form with CAPTCHA protection turned on rejects any submission that arrives without a valid challenge token, so the Share tab offers the custom-form snippets only for unprotected forms.
The embed is two snippets, not one
The Share tab gives you two blocks of code, and both belong on the page. The first is the iframe itself. The second is a small handler script that talks to that iframe.
For an inline form the script is optional and does one job: it keeps the embed at the form's own height as the content changes, so there is no awkward scrollbar. For a popup form it is required. Without it the popup never appears at all, and its exit-intent and scroll triggers never see the page, because those are events on your page rather than inside the frame. Copy both snippets whenever you embed a popup.
Set the confirmation behavior
The confirmation behavior is what a visitor sees the instant they submit. You choose one of two.
Show a message
A thank-you message displays in place of the form after submission. You can include an optional coupon code in the message, which makes forms a natural fit for a "subscribe and save 10%" offer. The visitor stays on the same page and sees your confirmation.
Redirect
A redirect sends the visitor to a URL you choose after they submit, such as a dedicated thank-you page or a next step in your funnel. Use this when the post-submission experience lives elsewhere on your site.
- Choose the behavior
In the builder, pick show a message or redirect as the confirmation behavior.
- Fill in the details
For a message, write the thank-you text and add a coupon code if you are offering one. For a redirect, enter the destination URL.
Remember that with double opt-in enabled, the confirmation behavior fires on submission, but the contact is only subscribed after they confirm via the emailed link. The two are separate steps: the on-page confirmation acknowledges the submission, and the emailed link completes the consent.
Read view and submission counts
Every published form tracks how many times it was viewed and how many times it was submitted. These counters live with the form's analytics in the Forms area and give you a simple conversion signal: a healthy view count with few submissions suggests the form or its offer needs work. Watch the two numbers together rather than in isolation, since a submission rate only means something against the traffic the form actually saw. If a popup converts poorly, its show trigger or frequency is often the culprit; if an inline form does, the fields or the surrounding copy usually are.
The contacts a form captures land in its bound contact schema, where you can view and manage them like any other record. See add and edit contacts for working with the people your form brings in, and revisit set up consent and double opt-in to confirm they arrive with the subscription state you intend.
Test the live form once
Because a form is a public page, it is worth a quick end-to-end test the first time you publish. This catches a mismapped field or a confirmation URL typo before real visitors ever see it.
- Submit through the real surface
Open the hosted link, or the page where you embedded the form, and submit a test entry with an address you can check.
- Confirm the outcome
Check that the confirmation behavior fired as expected, that a matching contact appears in the bound schema with the subscription state you configured, and, if you use double opt-in, that the confirmation email arrived with its link.
- Fix anything the test turned up
If a field is wrong or the redirect URL has a typo, click Edit in the form's header to unpublish it, correct it on the Builder tab, and publish again. Do this promptly: the form answers not-found for the whole time it is unpublished.
The hosted form page and the embed are public, unauthenticated surfaces, alongside the preferences and unsubscribe pages. Nobody signs in to submit a form, which is exactly why the publish gate, the rate limits, and your optional CAPTCHA together keep the surface safe. Once the test looks right, the form is ready for real traffic.
Configure form protection
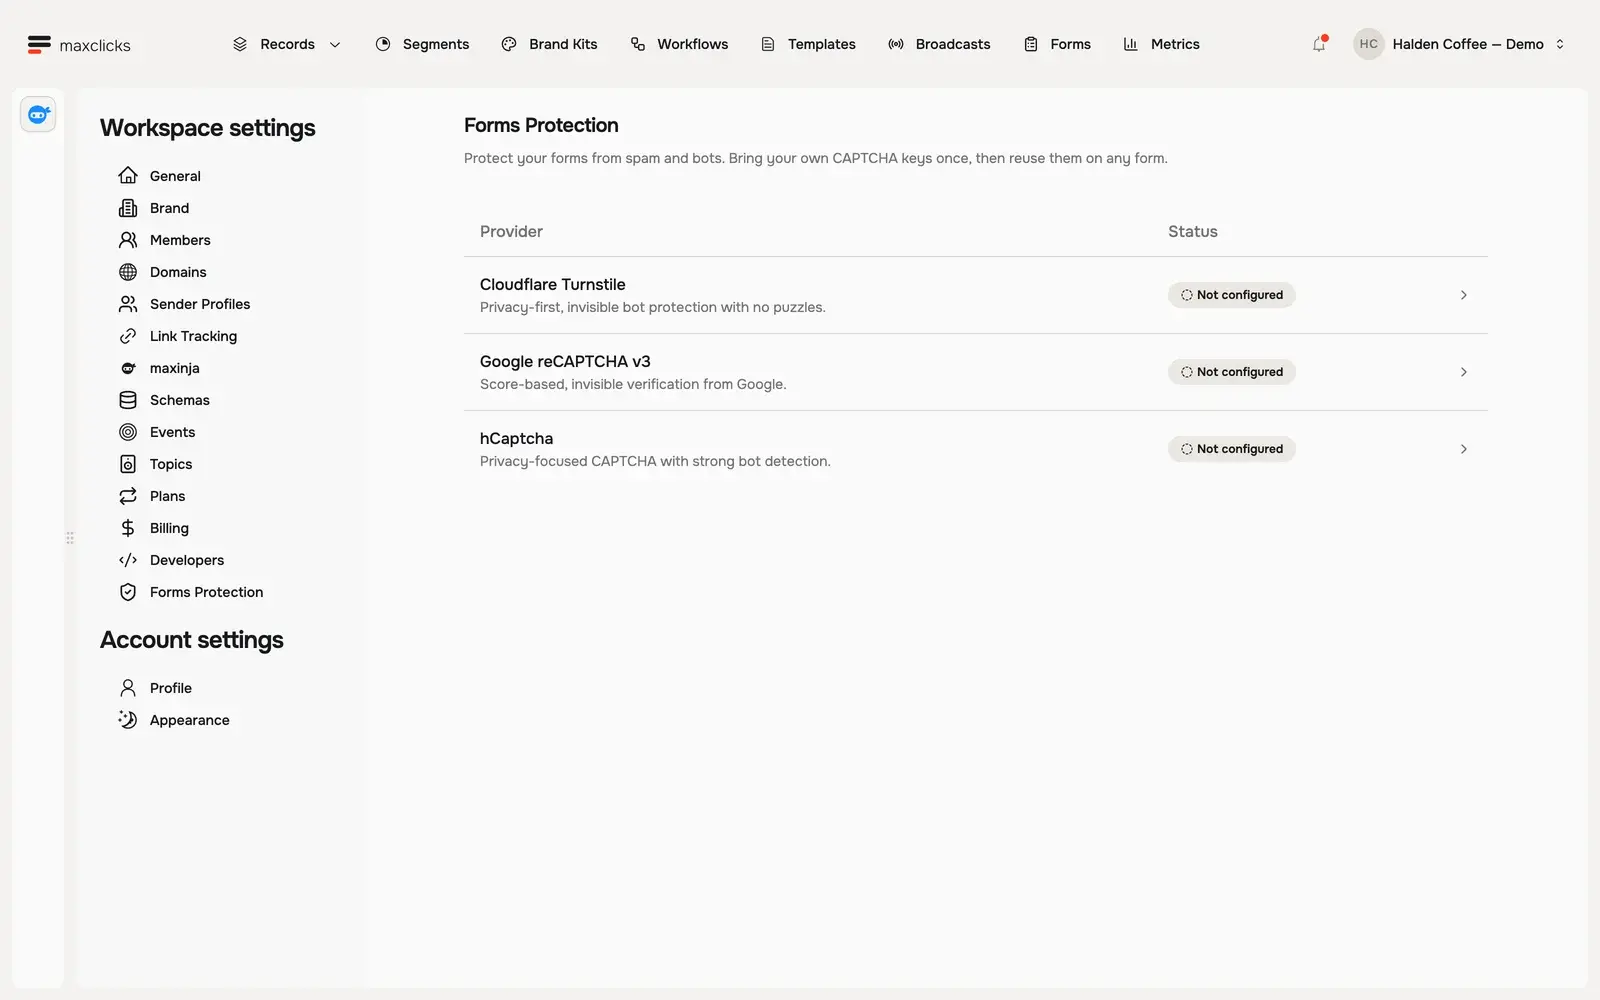
Open Settings → Forms Protection to configure your own provider keys for Cloudflare Turnstile, Google reCAPTCHA v3 or hCaptcha. Then choose the configured provider in the form’s settings. The demo below has no provider connected.
Frequently asked questions
Why is my form showing a not-found error?
The form is not published. A draft form returns not-found on both its hosted page and its embed, by design, so it cannot accept submissions before it is ready. The same happens to a live form you unpublished in order to edit it. Click Publish in the form's header to make it live.
Can I edit a form after publishing it?
Not while it is published. maxclicks locks a published form and replaces the Builder tab with Overview and Share. Click Edit in the form's header to unpublish it, make your change on the Builder tab, then publish again. The form is offline in between, so keep the gap short.
What are the ways to share a form?
Three: a hosted link that maxclicks serves, an iframe embed you place in your own page, and direct submission to the public form endpoint from your own front end. Use the hosted link for a standalone page, the embed to place it in an existing page, and the API for a fully custom form.
My embedded popup never appears. Why?
The handler script is missing. The Share tab gives you two snippets, and for a popup the second one is required: it is what opens the popup and what forwards your page's exit-intent and scroll events into the frame. Paste it alongside the iframe code.
Can I show a coupon code after someone signs up?
Yes. Choose the show-a-message confirmation behavior and include a coupon code in the thank-you message. The visitor sees it immediately after submitting.
Does the on-page confirmation mean the contact is subscribed?
Not necessarily. The confirmation behavior fires when the visitor submits. With double opt-in enabled, the contact is only subscribed once they click the confirmation link in the email. The on-page message and the emailed confirmation are separate steps.
Where do submitted contacts go?
Into the contact schema the form is bound to. You manage them there like any other contact, and their subscription state reflects the form's consent configuration and, if enabled, whether they completed double opt-in.
Did this article answer your question?